Video: Watch Elena paint the scene
Getting Started
Embark on a tranquil artistic journey as we delve into the serene world of painting atmospheric misty forests. This how-to was created by Opus Ambassador, Elena Markelova. Elena is BC-based professional watercolour artist that captures the essence of west coast of Canada.
To learn more about Elena Markelova's art or to enroll in one of her art classes, visit her website here.
Whether you're a seasoned artist or a curious beginner, this step-by-step video and article will show you how to paint a peaceful, atmospheric misty forest landscape, using the vibrant and expressive Opus Essential Watercolours.
From the soothing ritual of selecting your palette to the final brushstroke that breathes life into your canvas, each step is an invitation to explore the harmonious interplay of colors, textures, and emotions.
Here's What You'll Need
- Hooker’s Green Dark
- Phthalo Blue
- Payne’s Gray
- Perylene Green
Paper:
- Watercolour block, 100% cotton, cold pressed (e.g., Magnani Italia or Arches)
Brushes:
-
Opus Galiano Brushes:
- Round brushes (size 12, 8, and 4)
- Flat brush (½ inch)
- Quill brush (size 10)
Other Materials:
- Palette
- Paper towel
- Two water containers (one with clean water for blending, one to wash your brushes)
Here's How To Paint An Atmospheric Misty Forest

Step 1: Set up your work space
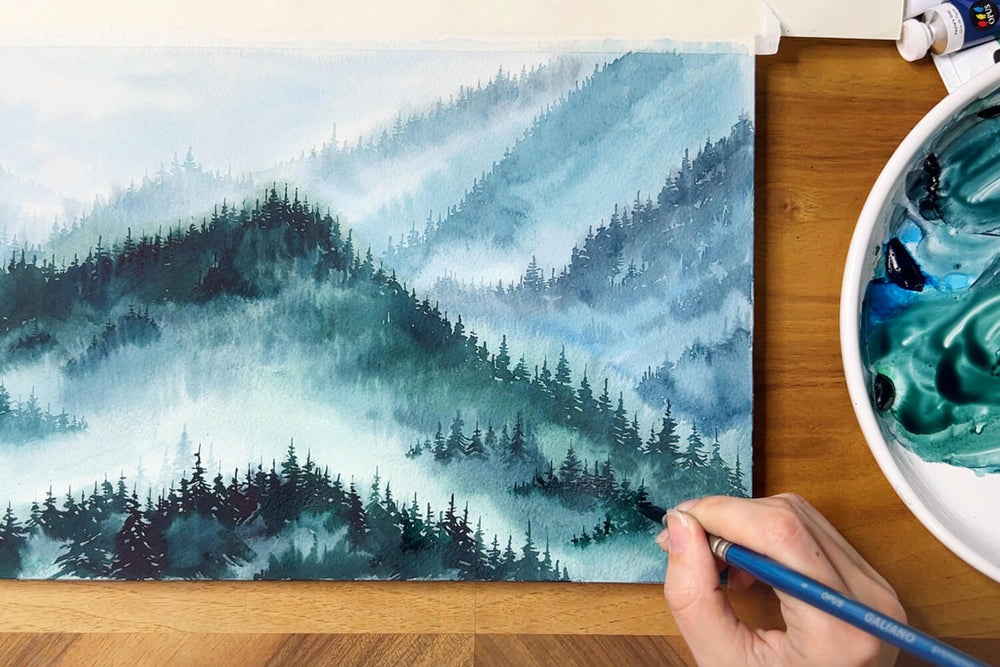
I turn on relaxing nature music that helps me to get into calm meditative state, then I lightly sketch mountains and hills, paying attention to the formations of cloud and mist. It’s important to not draw detailed trees or bushes at this point, but just elusively hint on their locations.

Step 2: Getting Started with Background
Next, I thoroughly wet the paper with clear water and my big quill brush. I’m being very gentle here not to rub the paper too much. While wetting the paper, I think about my next steps, mentally going through all the layers. Then I start to paint from the back to front - light gray blue mix in the sky, a darker mix in the distant hills. My strokes follow the direction of the subject that I paint, horizontal in the sky, angled on the hill, then vertical while adding the trees.

Step 3: Add darker trees up on the hill
To enhance a sense of depth and distance, I’m switching between quill and flat brush, adding darker trees up on the hills and the closer I get to the front of my composition. I make sure that the paper is still wet so that the transitions are nice and soft. To add variety, I use different proportions of blue and green and for deeper colours I add Payne’s Gray or Perylene Green to the mix.
💡 Hint
Using a ceramic/porcelain plate palette allows you to reuse the same colours while having more room to mix.

Step 4: Start the base and lift off water for a misty cloud effect
I paint the base of the front hill with a more pigmentated mixture of blue gray with Perylene Green and then add more water with the same quill brush to wet the rest of the paper. Again, I switch to a flat brush to strengthen the deep colours and shape the trees. I create an illusion of a cloud leaving some areas untouched and lifting off water of that specific area. This prevents dark trees that I paint on top from being dissolved and ruining the misty feel.
While paper is still wet, I finish the rest of the hill and retouch other areas to deepen some colours or add more trees.
💡 Hint
For a better lift-off, I wash the brush and dry it on a paper towel. The brush then becomes very ‘thirsty’ and easily absorbs the water. If you require to lift off more water, clean your brush again and repeat the rest.
While paper is still wet, I finish the rest of the hill and retouch other areas to deepen some colours or add more trees.

Step 5: Once top is dry, begin adding background details
Now as my paper dried up on the top, I come back with a smaller round brush to add distinctive treetops while blending the bottom parts. Make sure that your paint here is a little bit darker than the painted background. Holding my brush almost 90 degrees to the paper I start painting with a light gray blue mix, then wash my brush and rewet it in clean water cup to blend.
💡 Hint
To remove access water, use paper towel to dry clean brush, then soak the water off paper. You can also use paper towel here to soak water directly off the paper.

Step 6: Repeat the process
Then I repeat the same steps towards the front, getting my colour mixes darker and deeper, and switching to larger round or quill brush if needed. This is a slow process that requires a lot of attention and patience, and the calming nature music helps here tremendously.
If you use this technique to paint trees while the surface is still somewhat moist, the trees will blend with the background and enhance the misty atmosphere. If you paint the trees on a dry surface, the lines will be sharp and definite. I try to combine both in my misty paintings for the best results.

Step 7: Bringing detail to the foreground
In the foreground of my composition, I use darkest and most concentrated mixes of all for four colours with more Payne’s Gray or Perylene Green. The trees here are sharp and detailed with visible branches. I ether pre-wet the area where the bottoms of my trees will be with one brush and then paint the treetops with another one, or paint the tops first, and then add water for blending. In both cases you will get a smooth transition that is perfect for this atmosphere.

Step 8: Add a touch of wildlife
At the end, I paint an eagle flying over my misty mountains with Payne’s Gray. Adding a touch of wildlife always makes the artwork more alive and inviting.
The painting is now finished. I hope you enjoyed the process and proud of your artwork!

Elena Markelova, Artist
Elena Markelova is a BC-based watercolour artist inspired by Canada's natural beauty. She has been pursuing art since 10 years old, thanks to the artistic nurturing from her mother. Her art melds wildlife and landscapes, embodying the Canadian coastal essence that has captured her amazement since moving to BC in 2012.
Her artwork is created with love and each sale from her website supports reforestation, echoing her love for nature and commitment to environmental conservation.
Recent Articles

April 26, 2024
How To Be An Artist In The World with Wendy Welch

April 18, 2024
Hahnemühle Celebrates 440 Years
April 15, 2024
Blossoming As An Artist with Sandy Terry

April 12, 2024
The Opus Warehouse Sale 2024

April 05, 2024
Revival of Colour with Opus Essentials Spring Colours

April 02, 2024
How To Refill COPIC Markers

April 01, 2024
Liquitex: Just Imagine 2024

March 28, 2024
Art Events: Art Vancouver 2024

March 23, 2024
An Exploration Update with Cara Bain

March 20, 2024
How To Make A Mixing Chart with Daniel Smith Gouache
March 19, 2024
Learn to Draw Like Beya Rebai with Neocolor II

March 13, 2024
Customize Your Leather Trainers with Floral Motifs

March 13, 2024